Ah, fall. It’s the time of year when the air gets crisp and many students are living on their own for the first time. Plenty of Hoos are struggling to avoid death-by-ramen and opt for proper sustenance without spending their tuition’s worth on groceries. In fact, you may be one of those poor souls yourself.
Well, what if I told you there are some kitchen staples that are incredibly simple, cheap and — the best part — nutritious? There are some huge benefits to stocking your pantry with homemade food — namely, having complete control over what goes into your body. Additionally, all of these recipes can be made vegan-friendly if that is what you would prefer.
Oat milk
If you still swear by traditional milk, allow me to convince you to make the switch to plant-based milk with a single word — cost. Making your own oat milk is ridiculously cheap and takes minimal effort. Trust me, your bank account will thank you later.
Prep Time: 5 minutes
Cook Time: 5 minutes
Yields: 8 cups
Ingredients:
1 cup rolled oats
4 cups cold water
1 pinch of salt
Optional add-ins
½ teaspoon vanilla extract
1 date, pitted
Instructions:
- Pour oats, water, sweetener and additional add-ins into a blender or food processor and blend for 20 to 30 seconds. Over-blending can cause a slimy texture. If you prefer creamier oat milk, simply add less water. It should be noted that soaking your oats will also result in a slimy texture, so it’s best to add your ingredients straight into the blender.
- Once desired texture and sweetness is reached, simply place a cheesecloth or a clean t-shirt over a large mixing bowl and strain your liquid. Discard your oat pulp or use it in cookies, a smoothie or even a facemask. Feel free to double strain your mixture if it turns out too pulpy for your liking.
- Pour into an airtight container and store in the refrigerator for seven to ten days. Enjoy!
Price Comparison:
Harris Teeter oat milk: $3.99 for a gallon
Your delicious homemade oat milk: $1.92 for a gallon
Note — the homemade oat milk price is assuming you already have the tools and are not using any additional add-ins.
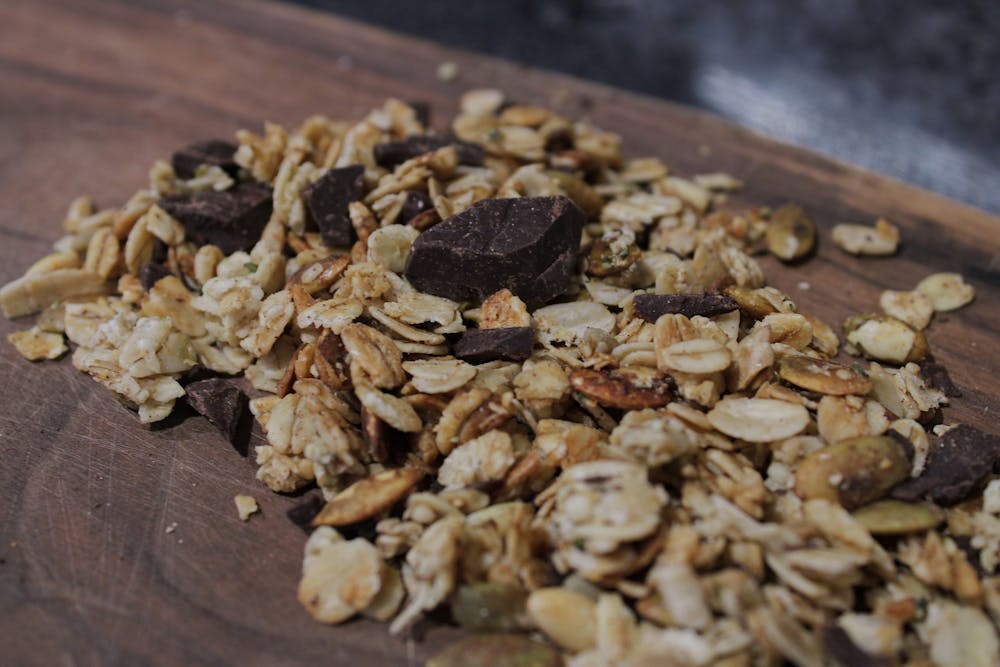
Granola
Granola is arguably one of the most versatile staples to have in your kitchen since you can top anything with it or even swap your morning cereal out for something extra crunchy and wholesome. Its functionality is truly endless, and the best part of making your own granola is how customizable it is. If you hate how much fat and sugar is in your store-bought granola with its exorbitant price tag, you can minimize those refined additives with this recipe for a more nutritious result.
Prep Time: 5 minutes
Cook Time: 24 minutes
Yields: 8 cups
Ingredients:
4 cups old-fashioned rolled oats
1 cup pumpkin seeds
½ cup sliced nuts or alternative protein source
A pinch of sea salt
½ cup olive oil or coconut oil
½ teaspoon cinnamon
1 tablespoon chia seeds
1 teaspoon vanilla extract for extra sweetness
½ cup natural sweetener such as honey, agave or maple syrup
Optional add-ins
½ cup dried fruit
1 bar chocolate of your choice, roughly chopped
½ cup coconut flakes
Instructions:
- Preheat the oven to 350 degrees and line a baking sheet with parchment paper.
- In a large mixing bowl, pour in your oats, seeds and nuts. Lightly mix with a spatula or spoon. Add in a sweetener of your choice and mix again until well-combined — for this step I like to get in there with my hands to save some time.
- Now, spread the mixture onto the prepared baking sheet in an even layer and bake for 20 minutes until the granola looks nice and golden, stirring halfway through. If you like your granola to be a little lumpier, lightly press the granola down after the midpoint stir.
- Allow the granola to cool completely in the pan for at least 45 minutes before adding in your fruit or chocolate. The granola continues to crisp up in the pan, so don’t panic if your granola seems a little soft at first.
- For the final step, break up the granola with your hands for larger pieces, or gently stir it with a spoon if you’d prefer smaller pieces. Store the granola in an airtight container for up to two weeks, or freeze it for up to three months. Keep in mind that any fruit you use will become hard if you choose to freeze your granola, so allow it to thaw completely before enjoying.
Price Comparison:
Harris Teeter: $20.05 for 64 ounces.
Your scrumptious granola: $9.24 for 64 ounces.
Note — These prices are assuming you already have the basic tools required to make the recipe in addition to some basic spices.
Breadcrumbs
If you haven’t had much experience with frying or are an absolute dunce in the kitchen, fear not. This recipe will help you with the most important part of the task — the delicious breading.
Breadcrumbs are the superior method of achieving a perfectly crisp, golden coating on your homemade Runk tendies, crispy veggies or whatever else you’d like to pop into the skillet. This recipe, like the others, may seem daunting but it is actually incredibly easy.
Prep Time: 5 minutes
Cook Time: 20 minutes
Yields: 2 cups
Ingredients
3 slices of bread cubed into 4 cups
Instructions:
- Preheat the oven to 300 degrees and line a baking sheet with parchment paper.
- Slice the bread into 1-inch cubes and add to a food processor — or your roommate’s Nutribullet — and process for about 30 seconds for coarse crumbs to a minute for finer crumbs.
- Transfer the crumbs to your prepared baking sheet and spread in an even layer before placing them on the center rack of the oven for 5-7 minutes.
- Stir the crumbs before baking again for another 5 or so minutes. The crumbs should feel dry to the touch and be lightly browned.
- Bake for an additional 2 to 3 minutes until completely dry if necessary.
- Allow those tiny bits of toast to cool completely for 10 to 15 minutes in the pan before transferring to an airtight container. These crumbs will last for several weeks and there’s no need to worry about them getting stale, as that adds to the crispy texture of your fried goodies.
Price Comparison:
Harris Teeter: $4.98 for 16 ounces.
Your perfectly-crisp breadcrumbs: $0.72 for 16 ounces.
Whether you’re an expert in the kitchen with a full arsenal, or someone who can’t distinguish the knife hilt from the blade, these recipes are sure to expand your culinary horizons. Plus, with the extra money you’ll save, you can foster a pet to be your new quarantine buddy — and yes, they absolutely need all of the Halloween costumes from Petco.
Read More

Seventy years later, Betty Phillips still looks forward to Monday
By Dana Douglas | 13 hours ago“‘You just become that nurse you want to be,’” Phillips said, quoting her grandmother. “That’s what I did. I never changed my mind from nursing, not one time.”

SugarBear Ice Cream: A sweet addition to Charlottesville's food scene
By Lucy Larsen | 4 days agoIn a city famous for what is on the menu, SugarBear convinced me to save room for dessert.

The Center for Teaching Excellence navigates the rise of AI use in education
By Phoenix Banks | July 18, 2026Through using a program like the Faculty AI Guides and promoting alternative grading methods in the classroom, CTE makes an attempt to further understand AI head-on.