While autumn is the quintessential season for baked goods, I returned to sunnier days to make my boyfriend an ice cream cake for his birthday this past weekend. The clear skies and mid-70s weather Sunday paired beautifully with a cotton candy, Oreo-caramel ice cream cake. Surprising my boyfriend with his favorite ice cream flavor from the beloved Moo Thru at the Dairy Market, combined with delicious Oreos and rich caramel sauce, this cake made our celebrations all the sweeter. This simple ice cream cake recipe is easy to customize and the perfect surprise treat for a celebration.
Taking inspiration from the Preppy Kitchen's ice cream cake recipe, I adapted my ice cream cake to suit my boyfriend’s unique tastes. He’s an ice cream lover through and through, so there was no need to add a cake layer to this dessert — I simply swapped it with more ice cream. While this recipe is overall very beginner-friendly, there are a few special tools that take its decoration to the next level. Piping bags and piping tips are super useful for making detailed designs and lettering — but the cake can be just as beautiful using a simple plastic bag and pair of scissors.
Prep Time: 20 minutes
Chill Time: at least 5 hours
Yield: 18 slices
Ingredients:
- 3 pints of ice cream
- 1 package of Oreos
- 1 stick unsalted butter, melted
- 1 pint heavy cream, chilled
- 3 tbsp powdered sugar
- 1 tsp vanilla extract
- ¼ cup caramel sauce, plus extra for decorating
Instructions:
- Fill a plastic bag with the whole Oreos and crush using a rolling pin to a medium to coarse dust.
- Combine ⅔ of the crushed Oreos with melted butter and mix well to form a paste, reserve ⅓ Oreo dust for step 9.
- In an 8-inch square baking pan, with at least 1-inch depth, place two layers of plastic wrap to cover the entire base and sides of the pan.
- Firmly press melted butter and Oreo mixture into an even layer in the plastic-lined pan.
- Chill the crust in the freezer for at least 20 minutes.
- While the crust is chilling, take out two pints of ice cream and allow to thaw slightly. Ice cream should be at an easily spreadable consistency, but not melted.
- Spread both pints of ice cream on top of the crust in an even layer.
- Chill cake in the freezer for about an hour.
- In a small microwave-safe bowl, heat up about ¼ cup caramel sauce and mix in remaining ⅓ crushed Oreos.
- After the cake has chilled and the top layer is somewhat firm to the touch, scoop small amounts of caramel and Oreo mixture evenly onto the ice cream layer.
- Chill cake in the freezer for about 20 minutes.
- While the cake is chilling, allow the third pint of ice cream to thaw to a spreadable consistency.
- Spread the final pint of ice cream evenly on top of the caramel and Oreo layer.
- Chill the cake in the freezer for about 20 minutes while preparing whipped cream topping.
- In a bowl combine the heavy cream, powdered sugar and vanilla extract. Beat with a whisk or hand mixer until stiff peaks form.
- Fill a piping bag fitted with a large star tip with homemade whipped topping, chill until cake is firmly chilled.
- Gently lift the ice cream cake out of the baking pan by pulling upward on the plastic wrap lining. May need to carefully rinse the tin with cool water to help release the cake. Place cake on a plate or cake stand for decorating.
- Pipe about ½ the whipped cream topping onto the top and sides of the cake and smooth with a butter knife to desired evenness.
- Chill the cake for about 10 minutes to allow whipped cream to set.
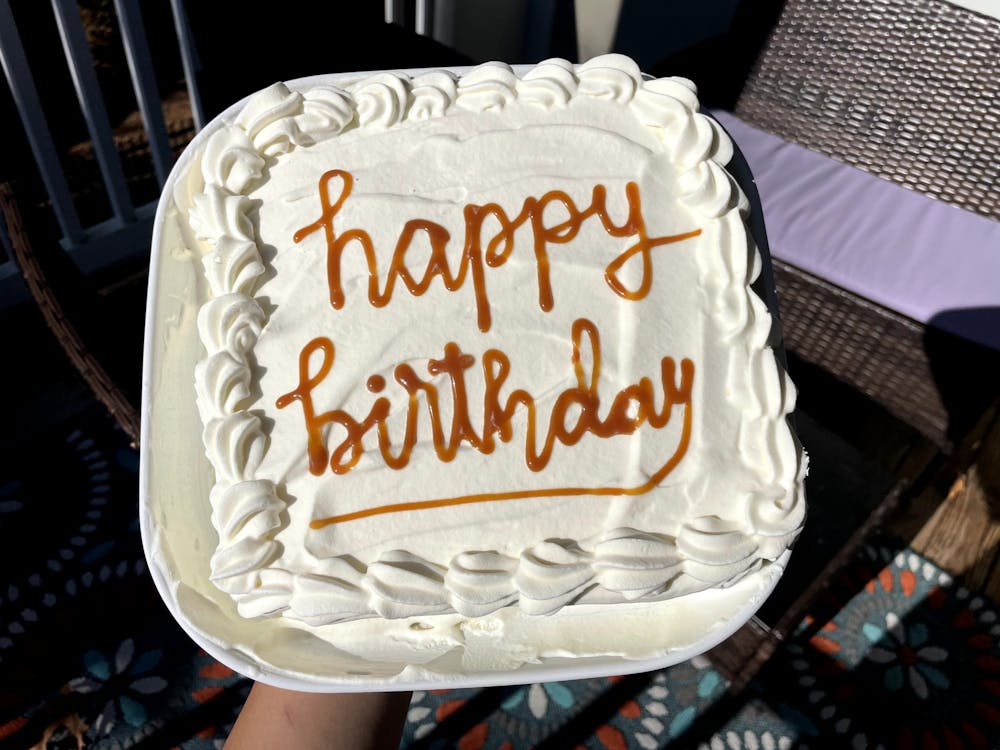
- Fill a small piping bag with caramel sauce and no piping tip. Microwave for about 5 seconds and cut a very small hole in the corner of the piping bag. Pipe “Happy Birthday,” or your desired message, into the center of the cake.
- Pipe a border along the top edge of the cake and cover any imperfections from the first layer of whipped cream.
- Chill the ice cream cake for at least 2-3 hours, or even overnight.
- Allow the cake to rest at room temperature for 2-3 minutes before slicing with a sharp knife dipped in warm water, and enjoy!
What I love about this recipe is how customizable it really is. Making the ice cream flavor a surprise — especially if you already know the special person’s favorite flavor — makes for a very personal touch. Alternatively, several different flavors can be used to create a layered or marbled effect. The Oreo crust can be swapped out for a graham cracker crust if that suits your personal preference — and with a myriad of gluten-free cookie and cracker options, this can be easily adjusted to fit dietary needs as well. While I have yet to try dairy-free ice cream in an ice cream recipe, I am certain it is possible. One thing to keep in mind with almond and coconut-based ice cream is that it can be very difficult to scoop, so the cake may need to sit at room temperature for slightly longer before digging in.
You can have a lot of fun with mix-ins as well. Pretzel bites would be a lovely addition to an ice cream cake that adds a bit of salt and crunch to balance the sweet flavor and soft texture of ice cream. Caramel sauce can be subbed out for chocolate fudge sauce or even sweetened condensed milk. Covering the entire cake in whipped cream may not be necessary — homemade ice cream cakes taste just as delicious, and are just as impressive, when served straight out of the pan and minimally decorated.
My boyfriend had no idea I was making his cake using his favorite ice cream — so when he cut into the cake to see the bright blue cotton candy ice cream his face lit up. Our parents who joined us to celebrate were impressed by my cake decorating and enjoyed the ice cream as well. I’ve certainly set the expectations high for his birthday cake next year. The ice cream cake combined with the warm weather contributed to a care-free atmosphere reminiscent of a relaxing summertime get-together, which was perfect for having fun and celebrating my boyfriend’s birthday despite being in the midst of the college semester.
Clinging to any last hopes of good summer vibes I could, I made my boyfriend an ice-cream cake for his early-November birthday — and it was a smashing success. This ice cream cake recipe is simple to assemble and requires no baking experience, making it perfect for anyone to try. I highly recommend making an ice cream cake for your next celebration to not only wow your guests, but deliver an unforgettable dessert that will have your family and friends remembering it for years to come.
Read More

To love in spite of fear
By Chase Coyte | YesterdayBut what I realized — what my experience with her helped me realize — is that most decisions are made out of fear. And that’s not necessarily a bad thing.

The Alley Light leaves the light on
By Abby Snowdon | 5 days agoBy design, The Alley Light isn’t just something you stumble upon — finding it is as deeply intentional as every single detail inside of the restaurant itself.

McIntire students navigate finance recruiting between new and old programs
By Malaika Rehman | July 7, 2026In a process dominated by high-stakes competition, constant networking and intense technical preparation, students across both McIntire programs emphasized a common theme — while access to resources matters, initiative matters more.